
Creating eCommerce applications requires integration with shopping platforms, one of which is Magento. It's API is what establishes the connection and makes it possible to get and manage such e-store data as categories, products, customers, etc.
While the Magento API is a vast topic, it is impossible to cover the entire topic in detail. That’s why we are going to cover only those aspects that novice developers should know about: it's architecture and how it can be used.
The Magento API Architecture – An Insight
Let us understand the architecture of the Magento API, as follows:
An HTTP request is made to the URL and then sent by Magento’s standard routing system to a controller that takes action in the module named “Mage_Api”. After that, a server object of the Magento API is instantiated by the controller action. Next, an object of the API type such as XML-RPC or any other is initialized and a call is made to the server object’s “run method”.
In a nutshell, the Magento API is a set of HTTP requests that consists of response messages in the form of XML and other formats.
API server is accountable for handling all of the API requests. It also helps to set the output regarding the response object directly. This way, you won't find any XML layout or don't have to make a call to methods such as loadLayout/renderLayout.
API object is a model that comes with a class alias such as API or server, which makes it a Mage_Api_Model_Serverobject. Even the server object uses an intended architecture for accomplishing its goals, and the architecture is described as below:
When the API server object is being initialized, depending on the parameters that are passed, the Magento configuration is being evaluated to identify the exact API adapter object and the handler object that needs to be instantiated. One important thing to notice is that the handler object is superior to an adapter object. Therefore, when the handler object's run method is called, the API server object makes a call to the adapter object's run method. This means that the adapter object will be mainly responsible for the API request completion.
Now understanding the relationship between Magento API adapters and handlers can give you a hard time. However, that relationship can be described using the below statement:
The adapter object is the one that is accountable for adding and instantiating both the API libraries and objects. On the other hand, the translation of the API function call to the right class and method of the Magento API depends on the handler.
In order to understand the above definition, you’ll need to get familiar with the history of such protocols as SOAP and XML-RPC.
Using the API in Magento
The Magento API basically supports two approaches known as SOAP (short for Simple Object Access Protocol) and REST (short for Representational State Transfer). These approaches help to solve various web issues and challenges. Let us now dwell on both SOAP and REST options in a more detailed manner:
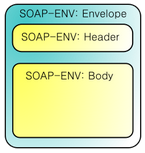
1. SOAP: It is an XML-based protocol that comprises 3 parts:
- envelope: it helps determine the structure of a message and how it can be processed.
- encoding rules: signifies instances of data types defined in the form of application.
- convention: is used for for presenting procedure calls and responses
Essentially, SOAP API is used for managing Magento eCommerce stores. For this purpose, it provides calls to work with several resources such as products, categories, etc. In order to become connected to Magento supported SOAP web services, you need to load the WSDL using the following URLs into your SOAP client:
https://newmagentohost/api/?wsdl
https://newmagentohost/api/soap/?wsdl
Note: In the above line of code, newmagentohost is the your Magento host domain name.
One important thing that needs to be noted is that those of you using Magento version 1.3 will have to use the below given URL for accessing the new Magento API of version 2 (it has been added for improving the compatibility of Magento with Java and .NET programming languages):
https://magentohost/api/v2_soap?wsdl=1
Below is a simple PHP example that illustrates the process following which SOAP makes a call to the version 1 of the Magento API:
$client= new SoapClient('https://newmagentohost/soap/api/?wsdl');
// If some stuff requires api authentication,
// then get a session token
$session = $client->login('apiUser', 'apiKey');
$result = $client->call($session, 'somestuff.method');
$result = $client->call($session, 'somestuff.method', 'arg1');
$result = $client->call($session, 'somestuff.method', array('arg1', 'arg2', 'arg3'));
$result = $client->multiCall($session, array(
array('somestuff.method'),
array('somestuff.method', 'arg1'),
array('somestuff.method', array('arg1', 'arg2'))
));
// If you don't need the session anymore
$client->endSession($session);
2. REST API
Most developers find SOAP complicated, and thus prefer using REST since it is easier to use. REST API determines a set of functions, using which developers are able to carry out requests and receive responses. One important thing to note is that this API supports two different formats for responses, namely: XML and JSON.
In essence, it is used for performing interaction using the HTTP protocol. The best part about this approach is that since it makes use of HTTP, it can be utilized for any type of programming language.
What's more? This API can also be used to manage a lot of resources, such as customers, sales order, customers' addresses, and product websites to name a few. However, to utilize any of the REST API resources, you'll need to follow simple steps as follows:
Step 1 – First of all, you have to login into the Magento admin panel and setup permissions for the REST-based resource operations.
Step 2 – Next, you just need to configure attributes in the Magento admin panel to address the needs of different users. Basically, there are three types of users: admin, customer and guest. The admin is the one who can access the backend, customer contains access to the front-end, and guest is any non-logged user (anyone accessing the front-end).
Below is an image that illustrates how the REST API is prepared for accessing third-party resources:

Note: The Magento REST API makes use of the OAuth 1.0a protocol for authenticating applications, allowing them to access the Magento service.
Now, let us look at an example to understand how you can create a simple product using your admin account with the help of Magento REST API:
<?php /** * Magento REST API. Example of simple product POST using Admin account. */ $urlForCallback = "https://mystore/oauth_admin.php"; $credentialsRequestUrl = "https://mystore/oauth/initiate?oauth_callback=" . urlencode($urlForCallback); $urlForAdminAuthorization = 'https://mystore/admin/oauth_authorize'; $urlForAccessToken = 'https://mystore/oauth/token'; $urlForApi = 'https://mystore/api/rest'; $accessKeyForConsumer = 'consumeraccesskey'; $secretForConsumer = 'consumersecret'; session_start(); if (!isset($_GET['oauth_token']) && isset($_SESSION['state']) && $_SESSION['state'] == 1) { $_SESSION['state'] = 0; } try { $authType = ($_SESSION['state'] == 2) ? OAUTH_AUTH_TYPE_AUTHORIZATION : OAUTH_AUTH_TYPE_URI; $oauthClient = new OAuth($consumeraccesskey, $secretForConsumer, OAUTH_SIG_METHOD_HMACSHA1, $authType); $oauthClient->enableDebug();
    if (!isset($_GET['oauth_token']) && !$_SESSION['state']) {
        $requestToken = $oauthClient->getRequestToken($credentialsRequestUrl);
        $_SESSION['secret'] = $requestToken['oauth_token_secret'];
        $_SESSION['state'] = 1;
        header('Location: ' . $urlForAdminAuthorization . '?oauth_token=' . $requestToken['oauth_token']);
        exit;
    } else if ($_SESSION['state'] == 1) {
        $oauthClient->setToken($_GET['oauth_token'], $_SESSION['secret']);
        $accessToken = $oauthClient->getAccessToken($accessTokenRequestUrl);
        $_SESSION['state'] = 2;
        $_SESSION['token'] = $accessToken['oauth_token'];
        $_SESSION['secret'] = $accessToken['oauth_token_secret'];
        header('Location: ' . $urlForCallback);
        exit;
    } else {
        $oauthClient->setToken($_SESSION['token'], $_SESSION['secret']);
        $urlForResource = "$urlForApi/products";
        $dataOfProduct = json_encode(array(
            'type_id'           => 'simple',
            'attribute_set_id'  => 4,
            'sku'               => 'demo_product_a',
            'weight'            => 10,
            'status'            => 1,
            'visibility'        => 2,
            'name'              => 'Demo Product',
            'description'       => 'Demo Product's Full Description',
            'short_description' => 'This is Short Description',
            'price'             => 20,
            'tax_class_id'      => 0,
        ));
        $headerData = array('Content-Type' => 'application/json');
        $oauthClient->fetch($urlForResource, $dataOfProduct, OAUTH_HTTP_METHOD_POST, $headerData);
        print_r($oauthClient->getLastResponseInfo());
    }
} catch (OAuthException $e) {
    print_r($e);
}
Conclusion
Though Magento 2 is here, it makes sense to first find out more about the Magento API v1 basic architecture and how it was used before diving in-depth and understanding the API of v2. Hope that reading this post has helped you understand both these key concepts of the Magento version 1 API.
Author Bio: Isabella Morris is currently employed with a renowned custom Magento development company and is also engaged in writing informative articles on best tools and tricks for Magento development. Her write-ups have proved beneficial for a wider group of Magento developers across the globe.