Have questions? Leave your message here or Schedule a quick call with our manager now
Have questions? Leave your message here or Schedule a quick call with our manager now
Event takes place when a user or an owner interacts with the shopping cart for some purpose. For example, events may be considered as user registration, product adding/updating or some other changes on the store.
For real-time synchronization, you can use webhooks. Learn more about webhooks here.
Additionally, if a platform does not support webhooks or if there is no webhook for a specific entity or action, you can use the list method for the corresponding entity with filters based on creation or modification date (provided the method supports these filters). In this case, you need to periodically execute this method to check which entities have been added or modified within the specified time frame.
Yes, API2Cart supports the following shopping carts plugins:
You can also download some plugins in the "Plugins" section of your API2Cart account.
The main difference between the Enterprise On-Premise solution and the other plans provided by API2Cart is that no one except your team will have access to the service resources (as it will be on your chosen server). Enterprise On-Premise solution guarantees you the highest level of data security that can be provided by API2Cart.
You can take sole control of who can manage your API2Cart server infrastructure by using the functionality provided by Amazon Web Service (AWS), Microsoft Azure, Hetzner Cloud, and Google Cloud Platform. Also, you can use API2Cart service on your own server.
All requests will be made over HTTPS protocol.
With the Enterprise On-Premise solution, you will be able to manipulate the data from as many of your clients’ stores as needed with no limits.
Also, Enterprise On-Premise solution includes webhooks, escrow service, WhiteLabel, and plugin builder.
Enterprise On-Premise solution is perfect for high-volume enterprises with a high number of clients.
To test API2Cart Enterprise On-Premise solution you will need to:
The usage of API2Cart Enterprise On-Premise solution includes continuous support by our dedicated tech specialists.
The API2Cart Bridge Connector allows you to easily integrate your store with API2Cart. Here you can find how to get the Bridge Connector installed and updated for stable integration.
There are several ways to get the bridge:
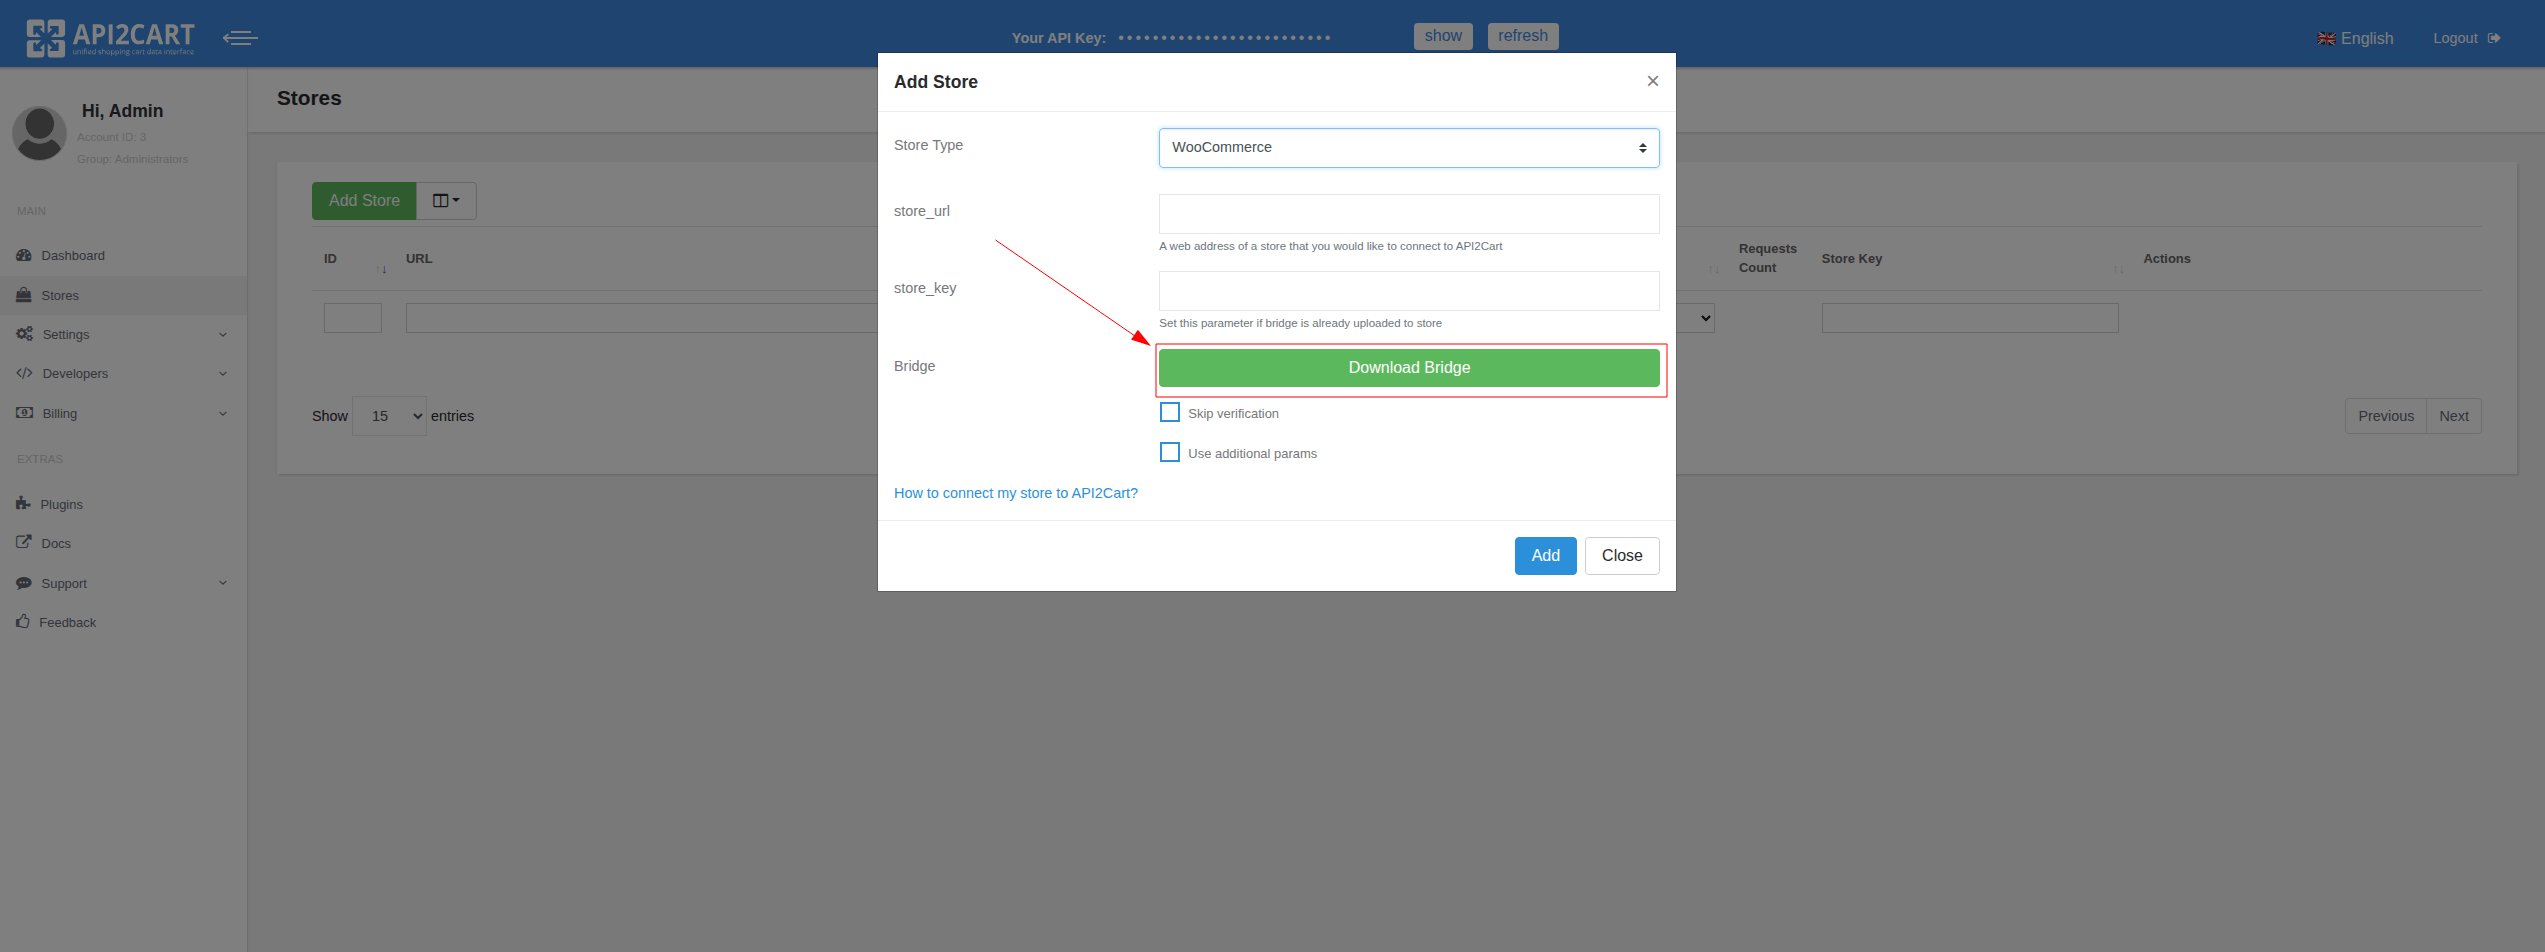
Download it manually when adding a store in the API2Cart admin panel.
Download it using a special API endpoint.
Use the special Bridge Connector plugin, which installs the bridge automatically, which are available for many popular platforms.
To do this, you need to build your own plugin using the Plugin Builder.
Also, for the most popular platforms, we already have ready-to-use plugins published on the respective marketplaces. You can find the list of them here.
For stable integration performance and access to new features, it’s important to have the latest version of the bridge installed.
To update the bridge to the latest version, follow the steps based on how you upload the bridge to your store:
You can find information about new Bridge Connector releases in our changelog.
Asymmetric data encryption has been added in version 141 of the bridge as well as plugins that can be built using the plugin builder. Data is encrypted using the OAEP (Optimal Asymmetric Encryption Padding) protocol, which provides reliable security and resistance to attacks.
When exchanging data between API2Cart and the server on which the bridge or plugin is installed, there is a risk of interception of this data. Especially if the data is not transmitted over a secure HTTP protocol, an attacker can gain unauthorized access to the database. In addition, if the attacker somehow learns the store_key, he can directly interact with the store through the bridge, bypassing API2Cart. To prevent this from happening, we implemented asymmetric data encryption.
Here's how it works:
This algorithm does not lead to significant delays in the execution of requests or additional load on the server and is a reliable tool for protecting confidential data during its exchange between parties.
Its main advantages:
Important Notice:
For security reasons, if no requests are received for a connected store within 60 consecutive days, the encryption keys will be permanently deleted from our servers.
What this means for bridges:
What this means for plugins with encryption enabled:
If no API2Cart requests are received from any store using the same plugin build for 60 days (i.e., complete plugin build inactivity), the encryption keys for that plugin will be deleted.
To restore access, you must:
Note: Once the encryption keys are deleted, they cannot be recovered. Reinstallation and reconnection are mandatory steps to resume secure API communication.
We provide a unified API to work with multiple shopping carts and marketplaces. By integrating with our API, you can integrate with different e-Commerce platforms such as Magento, PrestaShop, Bigcommerce, Shopify, OpenCart, Volusion, etc. at the same time, without any need to develop separate integration solutions for each shopping cart.
The integration works the following way - you already have your business logic module which is integrated with API2Cart. Thus, you receive a complex solution which can work with numerous platforms - hosted and self-hosted. You will have to establish connection via connection bridge or provide store access details - and you'll be able to retrieve necessary data and process it with your solution. So, API2Cart is a universal programming interface which will help you optimize eCommerce integration process.
Make sure you have performed WooCommerce upgrade correctly to allow WooCommerce and API2Cart work with your orders properly.
There are two ways to establish WooCommerce upgrade:
After updating the WooCommerce plugin, you need to execute the cart.validate method. This is necessary because API2Cart stores store settings in the cache. The cart.validate method clears the cache for the selected store, ensuring that all changes are considered in subsequent requests.
Notice that only after that, database version is updated. Otherwise, you won’t be able to view the previously placed orders in WooCommerce itself. And API2Cart will not be able to detect new WooCommerce version, thus work with new orders.
When the registration is completed, you are automatically redirected to your API2Cart account. In the “My Stores List” section you will find OpenCart demo store which is available for testing service’s functionality.
You can also add demo stores that can be created in the "Demostores" section of your API2Cart account. More details at Demo store in API integration
Many shopping carts have an entity limit in one request. Even if it is said that there is no limitation, you should be careful and not to include too many entities in a single API request since it may negatively affect your system and client’s store performance. It is better to extract data in smaller chunks (4-50 items), what guarantees a correct result.
API2Cart makes it possible to extract a maximum of 250 elements in our list methods. Sometimes this value can be smaller for some API-based platforms due to technical limitations on the part of the platform. We recommend selecting values from 20 to 250 individually for each type of request and store. When selecting the count value, you should take into account the request execution time, the list of fields that will be in the response, and how long your application can wait for a response from API2Cart.
Read more about limits from the side of the stores.
It all depends on the speed of connection and your shopping cart server, as well as the type of shopping cart. For example, the requests for Magento take more time than for the shopping cart like osCommerce. While retrieving data from shopping cart specify the necessary fields in the parameters. This will speed up the process. Do not specify the unnecessary fields, because for some fields additional requests may be sent, which increases the time of data retrieving.
It is also important to consider that due to the specifics of some shopping cart platforms, we need to make multiple requests to the store to generate a response for you. The number of requests directly depends on the selected response fields, and for some platforms, it may also grow exponentially based on the number of items in the response (e.g., products or orders). Therefore, the more items you try to retrieve at once, the more requests we will need to make to the store.
That is why we recommend obtaining only the response fields that are truly necessary for your business logic. For these purposes, you need to use the response_fields parameter. In the store dashboard, you can view a list of methods that include links with field sets requiring the minimal number of requests to the store:

Our developers are constantly improving the service to provide its fast and reliable performance.
API2Cart uses Customer.list API method that help to retrieve following data:
This method also includes the fields that were created in the shopping cart backend (admin section) and the specific fields, which are set for this shopping cart by default.
API2Cart constantly improves its services, so we expect to deliver you all the required methods in the near future. Please contact us in order to request necessary functionality.
Connection Bridge file is what helps API2Cart users connect stores which are based on open-source shopping platforms like Magento, WooCommerce, PrestaShop, and CS-Cart. API2Cart API works directly with databases of such types of shopping platforms via a bridge file. Read more.
We use the minimum amount of code in our bridge files. Running SQL queries allows us to retrieve the data directly without running all the shopping cart code. What is more, the bridge allows us to work with the data that is not available via the platform’s API.
Benefits of the Connection Bridge:
- Speed
- Low server load, because all data is processed on our side.
- Flexibility, as we can add new methods without updating the bridge.
This special access gateway is secured by the unique signature and encryption for safe data processing. To add a store to your API2Cart account you have to set up Connection Bridge to enable data interaction.
Read where you can get the Connection Bridge.
There are three ways you can connect Bridge file:
1. Manually download the Bridge to your computer. It will be stored in a zip file named “bridge.zip”. Extract the file. It will contain the “bridge2cart” folder. Upload it to the store’s root folder via FTP client (WinSCP, FileFTP, FileZilla, CuteFTP, etc.)
If needed, the bridge file can be stored in any folder on the server, but in that case you’ll need to use parameters bridge_url (the full http url for a bridge) and store_root (absolute server path to the store root folder).
If the bridge folder is contained in the store root folder, then you don’t need to specify store_root parameter, only bridge_url.
After uploading the bridge, use account.cart.add method.
2. Automatically upload the Bridge via account.cart.add method. Use account.cart.add method specifying FTP credentials (Host, Port, Login, Password and Store Path) or use API2Cart admin panel.
3. Using plugins that can be built in the Plugin Builder section on your API2Cart account.
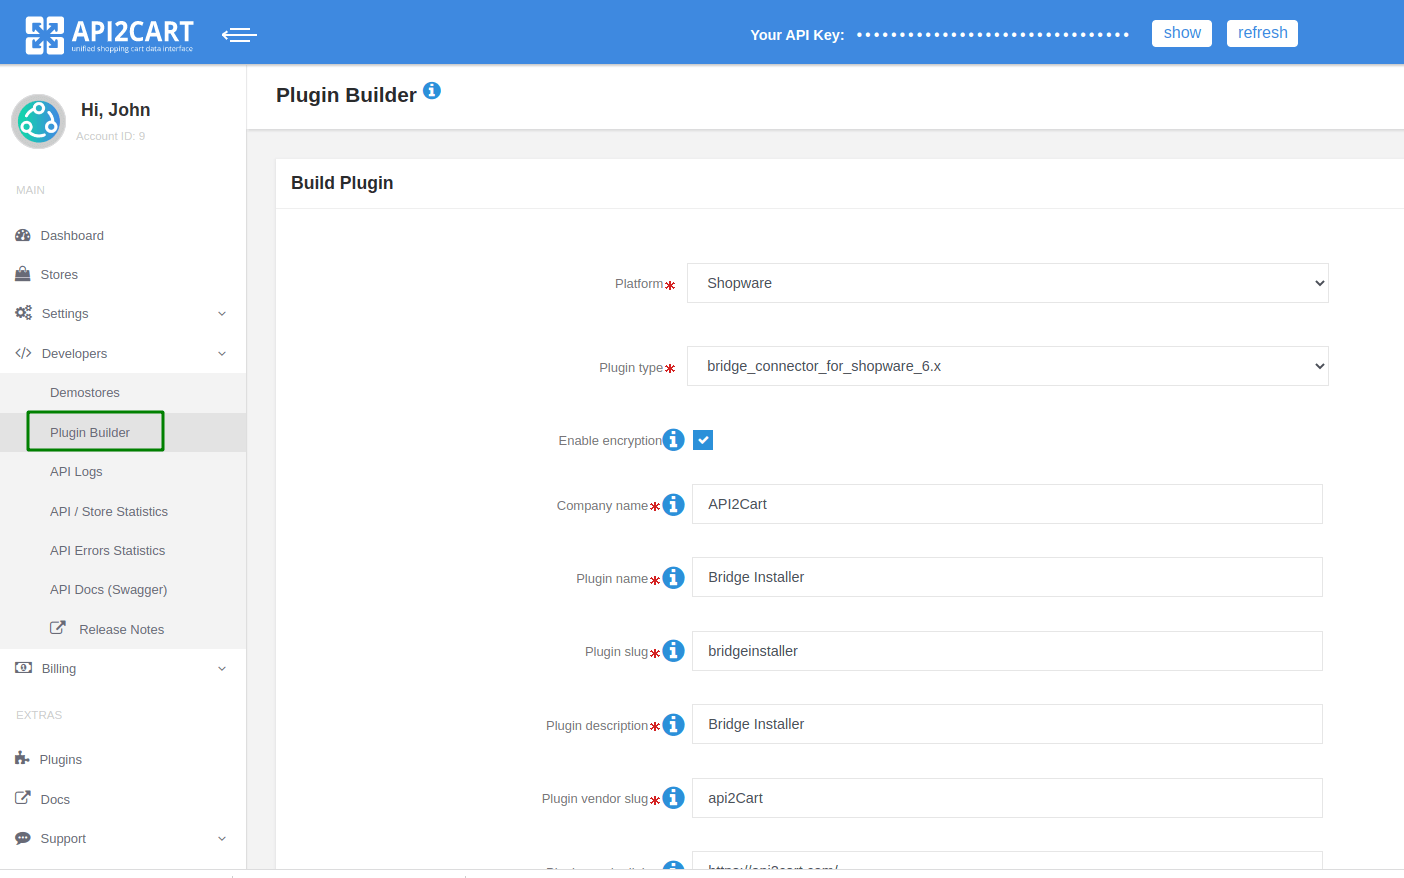
Plugin uploads the bridge and installs it to the store’s root folder. You can place the plugin on the platform app marketplace. Then, your clients will be able to install the bridge in one click.
To check if the Connection Bridge file has been installed correctly enter https://[yourstore url]/bridge2cart/bridge.php within your browser address line. If the bridge file is working correctly, you will see the following message:
“Version: xx
BRIDGE INSTALLED.”
If not, please set the following permissions:
- 644 or 666 for "bridge.php", depending on your server configuration
- 755 or 777 for "/bridge2cart" folder, depending on your server configuration
Note! We strongly recommend turning off your website redirects to ensure proper functioning of the Connection Bridge file.
If you have any questions during the process of bridge installation, please read this article or contact us by email ([email protected]).
You can use the parameter force_all (for example, product.list?api_key=<your_api_key>&store_key=<your_store_key>&start=0&count=10¶ms=force_all.) or use the response_fields parameter, which will contain the result field (for example, order.list?api_key=<your_api_key>&store_key=<your_store_key>&start=0&count=10&response_fields={return_code,return_message,pagination,result}).
For more information go to API2Cart Documentation.
Discover how API2Cart can ease your eCommerce integrations with a personalized demo. See how seamlessly our solution can connect your software with over 40 eCommerce platforms.
Don't miss out! This is an exclusive one-time offer. Secure your additional trial period by booking your demo now.