Have questions? Leave your message here or Schedule a quick call with our manager now
Have questions? Leave your message here or Schedule a quick call with our manager now
To install SDK, download an SDK file for programing language you need.
To install the SDK for the corresponding programming language, follow the instructions described in the README.md file contained in the downloaded archive.
If you use PHP then you can install our SDK with composer.
The installation process will begin and show a message when it’s finished. You can optionally click on “Refresh” button to see whether the extension is installed or not.
The page will reload, and you should see the new module in a list of your modules.
After a successful installation, in the "Add-ons" page you will see the API2Cart plugin.
Parameters supported in the product.add method for Amazon SP-API
asin, ean, gtin, upc parameters are identifiers that identify a product in the Amazon catalog. Every product that is in the Amazon catalog has a unique asin.
To add a product that already exists in the Amazon catalog, you only need to provide the SKU, the product identifier, and the price and quantity. The quantity can be zero. Only integer values are supported. After a while, the product will appear in the seller's catalog and will have the properties of the product that was assigned to the identifier (name, description, attributes, images, etc.) as well as the seller's offer (offer), which is determined by the price and quantity.
Adding a new product that does not exist in the Amazon catalog is a more complex process, as Amazon requires filling out a large number of attributes to create a new product with an indication of the category in which the product will be placed.
Therefore, when creating a product through product.add, if the product identifier that does not yet exist in the Amazon catalog is specified, one of the parameters must be specified: category_id or product_type
To work with Amazon categories, we have added support for the category.count\list\info\find methods.
In the response of the category.list\info methods, the product_types field is displayed in additional_fields. If it contains any data, the ID of this category can be passed in the category_id parameter. Instead of the category_id parameter, you can use the product_type parameter, specifying the value of the additional_fields.product_types field (if the additional_fields.product_types field contains several values, separated by commas, then one of them).
Once one of the category_id or product_type parameters has been defined, you need to pass the attributes of the new product that is being created in the Amazon catalog. For a list of mandatory requirements for a certain product type (product_type) in Amazon, there is a JSON-schema. This JSON-schema is displayed in the category.info method in the additional_fields.category_options field (category.list this field is not displayed to save requests to Amazon).
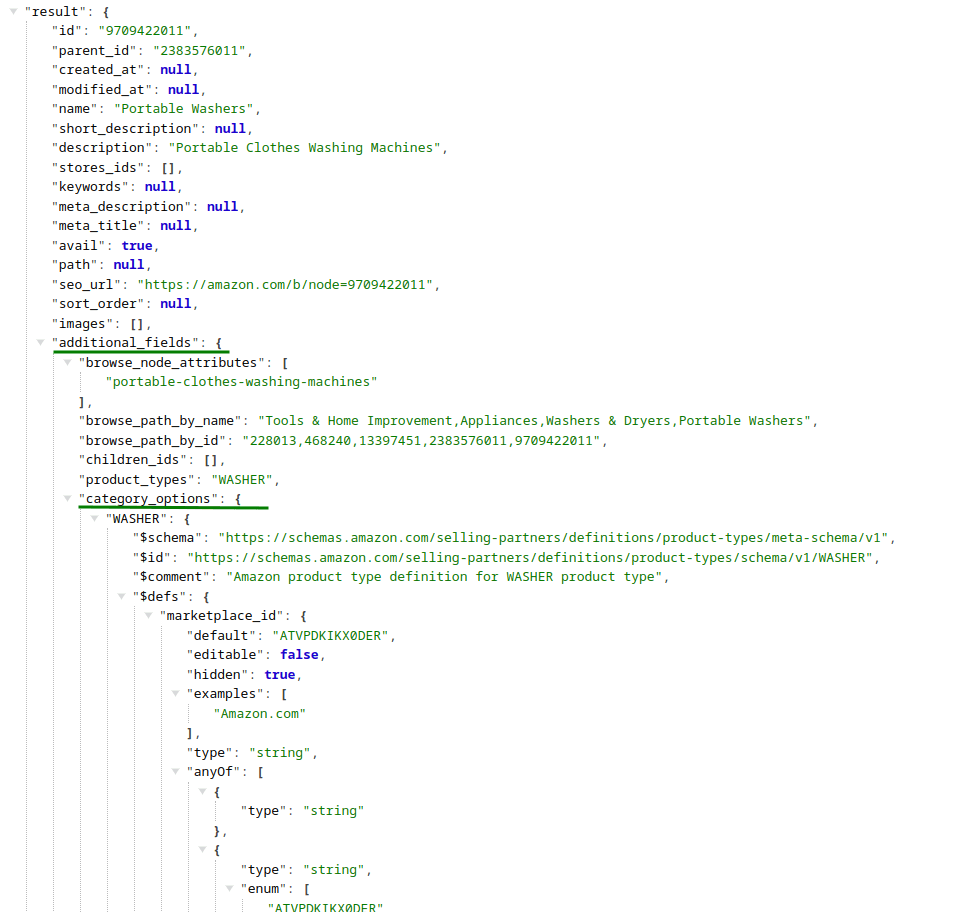
As you can see from the image, the additional_fields.category_options object contains a WASHER object with the corresponding JSON-schema. If additional_fields.product_types contains multiple values, then JSON-schemas for all product types will be displayed.
The data from the JSON-schema fields is passed in the marketplace_item_properties parameter. This parameter is validated both on the Api2Cart side
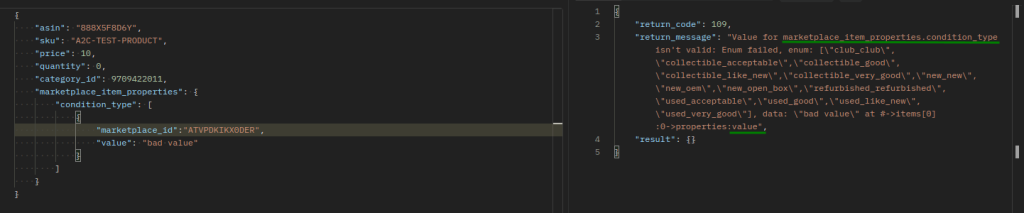
and on the Amazon side.
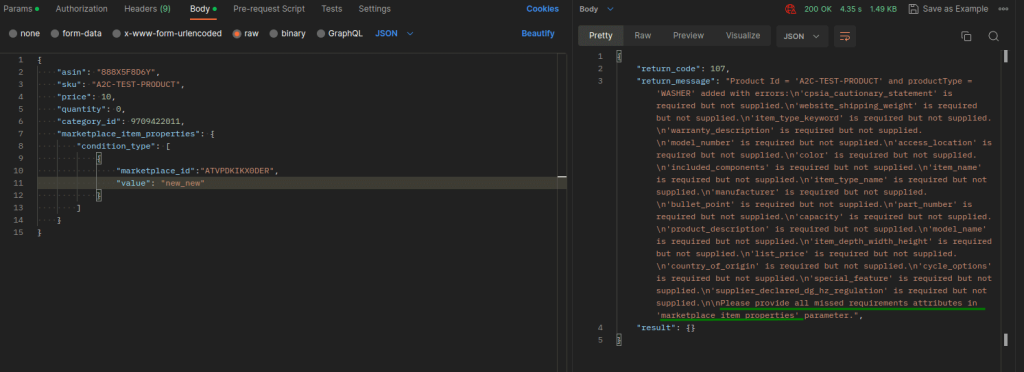
The corresponding errors that will be displayed in an unsuccessful attempt of the product.add method.
If all the required properties for a certain product type are passed, the product will be created in the Amazon catalog.
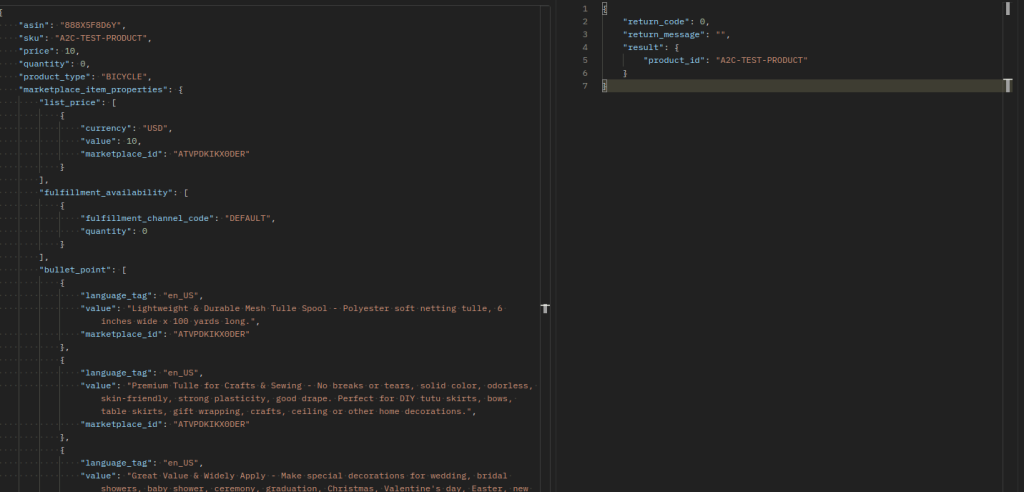
Even if we received a response with return_code: 0 for the product.add method on Amazon SP-API, this does not mean that Amazon will immediately place the product in its catalog and the seller's catalog among its offers. This product may require additional adjustments in the seller's admin panel. Such products are located in the Catalog > Complete Your Drafts menu section.

which will contain product drafts and Amazon's appropriate troubleshooting guidelines for their listing of these products.
In order to see all additional parameters that are unique for your shopping cart, call product.list API method with the params=force_all parameter. Or set the necessary fields separated by comma in parameter "params" (params=length,depth).
Customer API methods allow you to manage customers in the store. It is possible to:
Run customer.add method, to add customers to the store, and provide all necessary parameters.
public function apiAdd($params)
{
  $params = array(
    'email'      => '[email protected]',
    'first_name' => 'John',
    'last_name'  => 'Smith',
  );

  return $api->request('customer.add', $params);
}
If you want to update the customer, call customer.list method to retrieve customer id.
public function apiList($params)
{
  $params = array(
    'start' => 0,
    'count' => 5
  );

  return $api->request('customer.list', $params);
}
When you get your customer id, you are able to perform customer.update method.
public function apiUpdate($params)
{
  $params = array(
    'id'         => 11,
    'first_name' => 'Jack',
    'last_name'  => 'Smith',
  );

  return $api->request('customer.update', $params);
}
For more methods jump into documentation.
When signing up for API2Cart account, you are asked to provide name, e-mail address, password.
When adding a new store, you are asked to provide API key and store URLs. You may also be asked to provide your direct database connection to speed up the process. We take appropriate security measures to protect your information. Find out more about our Privacy Policy.
To learn more about adding a store to the service, read here.
Discover how API2Cart can ease your eCommerce integrations with a personalized demo. See how seamlessly our solution can connect your software with over 70 eCommerce platforms.
Don't miss out! This is an exclusive one-time offer. Secure your additional trial period by booking your demo now.