Have questions? Leave your message here or Schedule a quick call with our manager now
Have questions? Leave your message here or Schedule a quick call with our manager now
The API2Cart Bridge Connector allows you to easily integrate your store with API2Cart. Here you can find how to get the Bridge Connector installed and updated for stable integration.
There are several ways to get the bridge:
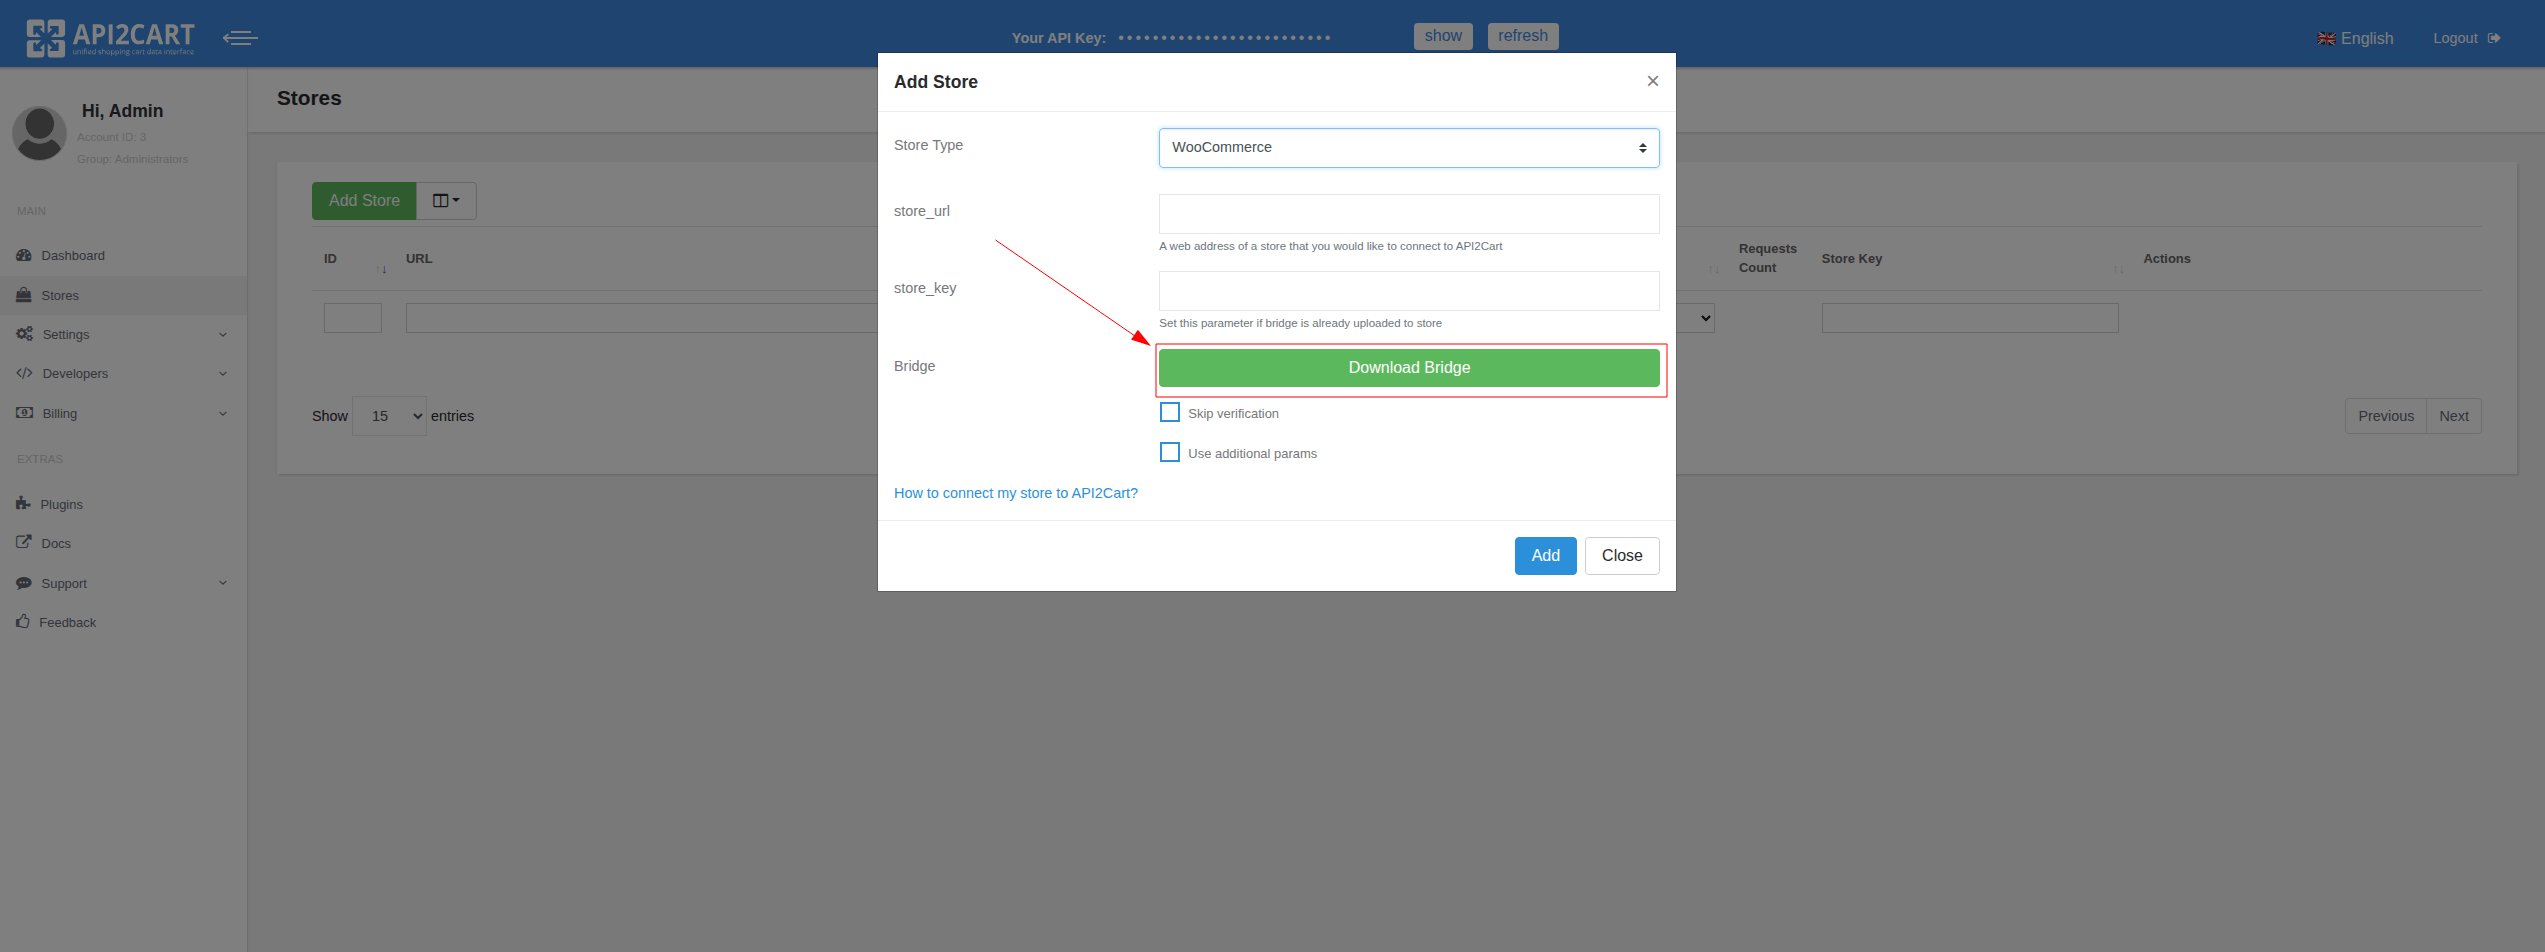
Download it manually when adding a store in the API2Cart admin panel.
Download it using a special API endpoint.
Use the special Bridge Connector plugin, which installs the bridge automatically, which are available for many popular platforms.
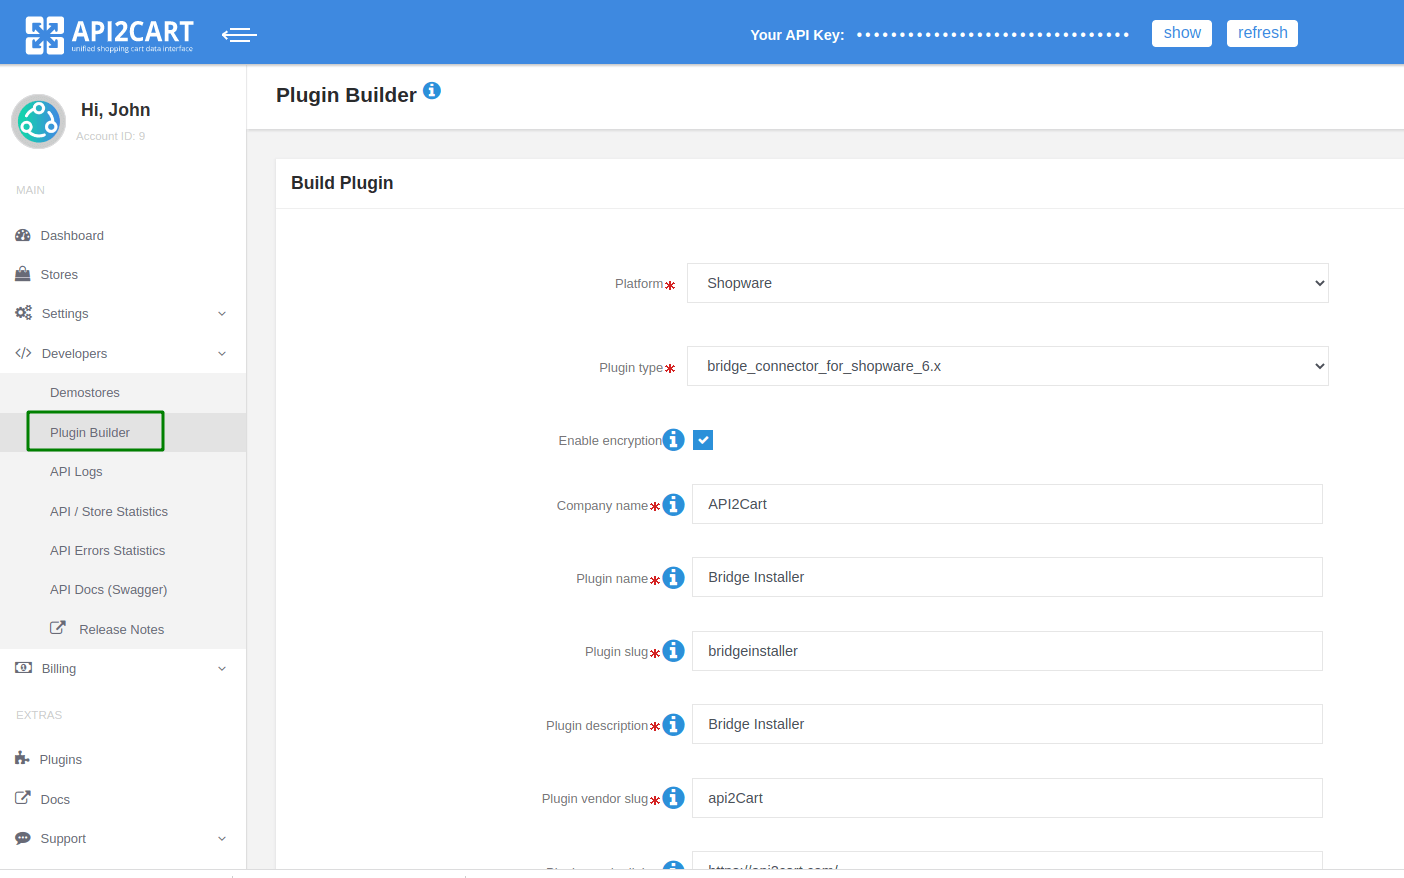
To do this, you need to build your own plugin using the Plugin Builder.
Also, for the most popular platforms, we already have ready-to-use plugins published on the respective marketplaces. You can find the list of them here.
For stable integration performance and access to new features, it’s important to have the latest version of the bridge installed.
To update the bridge to the latest version, follow the steps based on how you upload the bridge to your store:
You can find information about new Bridge Connector releases in our changelog.
Asymmetric data encryption has been added in version 141 of the bridge as well as plugins that can be built using the plugin builder. Data is encrypted using the OAEP (Optimal Asymmetric Encryption Padding) protocol, which provides reliable security and resistance to attacks.
When exchanging data between API2Cart and the server on which the bridge or plugin is installed, there is a risk of interception of this data. Especially if the data is not transmitted over a secure HTTP protocol, an attacker can gain unauthorized access to the database. In addition, if the attacker somehow learns the store_key, he can directly interact with the store through the bridge, bypassing API2Cart. To prevent this from happening, we implemented asymmetric data encryption.
Here's how it works:
This algorithm does not lead to significant delays in the execution of requests or additional load on the server and is a reliable tool for protecting confidential data during its exchange between parties.
Its main advantages:
Important Notice:
For security reasons, if no requests are received for a connected store within 60 consecutive days, the encryption keys will be permanently deleted from our servers.
What this means for bridges:
What this means for plugins with encryption enabled:
If no API2Cart requests are received from any store using the same plugin build for 60 days (i.e., complete plugin build inactivity), the encryption keys for that plugin will be deleted.
To restore access, you must:
Note: Once the encryption keys are deleted, they cannot be recovered. Reinstallation and reconnection are mandatory steps to resume secure API communication.
The main difference between the Enterprise On-Premise solution and the other plans provided by API2Cart is that no one except your team will have access to the service resources (as it will be on your chosen server). Enterprise On-Premise solution guarantees you the highest level of data security that can be provided by API2Cart.
You can take sole control of who can manage your API2Cart server infrastructure by using the functionality provided by Amazon Web Service (AWS), Microsoft Azure, Hetzner Cloud, and Google Cloud Platform. Also, you can use API2Cart service on your own server.
All requests will be made over HTTPS protocol.
With the Enterprise On-Premise solution, you will be able to manipulate the data from as many of your clients’ stores as needed with no limits.
Also, Enterprise On-Premise solution includes webhooks, escrow service, WhiteLabel, and plugin builder.
Enterprise On-Premise solution is perfect for high-volume enterprises with a high number of clients.
To test API2Cart Enterprise On-Premise solution you will need to:
The usage of API2Cart Enterprise On-Premise solution includes continuous support by our dedicated tech specialists.
Yes, API2Cart supports the following shopping carts plugins:
You can also download some plugins in the "Plugins" section of your API2Cart account.
Make sure you have performed WooCommerce upgrade correctly to allow WooCommerce and API2Cart work with your orders properly.
There are two ways to establish WooCommerce upgrade:
After updating the WooCommerce plugin, you need to execute the cart.validate method. This is necessary because API2Cart stores store settings in the cache. The cart.validate method clears the cache for the selected store, ensuring that all changes are considered in subsequent requests.
Notice that only after that, database version is updated. Otherwise, you won’t be able to view the previously placed orders in WooCommerce itself. And API2Cart will not be able to detect new WooCommerce version, thus work with new orders.
It all depends on the speed of connection and your shopping cart server, as well as the type of shopping cart. For example, the requests for Magento take more time than for the shopping cart like osCommerce. While retrieving data from shopping cart specify the necessary fields in the parameters. This will speed up the process. Do not specify the unnecessary fields, because for some fields additional requests may be sent, which increases the time of data retrieving.
It is also important to consider that due to the specifics of some shopping cart platforms, we need to make multiple requests to the store to generate a response for you. The number of requests directly depends on the selected response fields, and for some platforms, it may also grow exponentially based on the number of items in the response (e.g., products or orders). Therefore, the more items you try to retrieve at once, the more requests we will need to make to the store.
That is why we recommend obtaining only the response fields that are truly necessary for your business logic. For these purposes, you need to use the response_fields parameter. In the store dashboard, you can view a list of methods that include links with field sets requiring the minimal number of requests to the store:

Our developers are constantly improving the service to provide its fast and reliable performance.
You can use the parameter force_all (for example, product.list?api_key=<your_api_key>&store_key=<your_store_key>&start=0&count=10¶ms=force_all.) or use the response_fields parameter, which will contain the result field (for example, order.list?api_key=<your_api_key>&store_key=<your_store_key>&start=0&count=10&response_fields={return_code,return_message,pagination,result}).
For more information go to API2Cart Documentation.
Connection Bridge file is what helps API2Cart users connect stores which are based on open-source shopping platforms like Magento, WooCommerce, PrestaShop, and CS-Cart. API2Cart API works directly with databases of such types of shopping platforms via a bridge file. Read more.
We use the minimum amount of code in our bridge files. Running SQL queries allows us to retrieve the data directly without running all the shopping cart code. What is more, the bridge allows us to work with the data that is not available via the platform’s API.
Benefits of the Connection Bridge:
- Speed
- Low server load, because all data is processed on our side.
- Flexibility, as we can add new methods without updating the bridge.
This special access gateway is secured by the unique signature and encryption for safe data processing. To add a store to your API2Cart account you have to set up Connection Bridge to enable data interaction.
Read where you can get the Connection Bridge.
There are three ways you can connect Bridge file:
1. Manually download the Bridge to your computer. It will be stored in a zip file named “bridge.zip”. Extract the file. It will contain the “bridge2cart” folder. Upload it to the store’s root folder via FTP client (WinSCP, FileFTP, FileZilla, CuteFTP, etc.)
If needed, the bridge file can be stored in any folder on the server, but in that case you’ll need to use parameters bridge_url (the full http url for a bridge) and store_root (absolute server path to the store root folder).
If the bridge folder is contained in the store root folder, then you don’t need to specify store_root parameter, only bridge_url.
After uploading the bridge, use account.cart.add method.
2. Automatically upload the Bridge via account.cart.add method. Use account.cart.add method specifying FTP credentials (Host, Port, Login, Password and Store Path) or use API2Cart admin panel.
3. Using plugins that can be built in the Plugin Builder section on your API2Cart account.
Plugin uploads the bridge and installs it to the store’s root folder. You can place the plugin on the platform app marketplace. Then, your clients will be able to install the bridge in one click.
To check if the Connection Bridge file has been installed correctly enter https://[yourstore url]/bridge2cart/bridge.php within your browser address line. If the bridge file is working correctly, you will see the following message:
“Version: xx
BRIDGE INSTALLED.”
If not, please set the following permissions:
- 644 or 666 for "bridge.php", depending on your server configuration
- 755 or 777 for "/bridge2cart" folder, depending on your server configuration
Note! We strongly recommend turning off your website redirects to ensure proper functioning of the Connection Bridge file.
If you have any questions during the process of bridge installation, please read this article or contact us by email ([email protected]).
API2Cart uses Customer.list API method that help to retrieve following data:
This method also includes the fields that were created in the shopping cart backend (admin section) and the specific fields, which are set for this shopping cart by default.
API2Cart constantly improves its services, so we expect to deliver you all the required methods in the near future. Please contact us in order to request necessary functionality.
Many shopping carts have an entity limit in one request. Even if it is said that there is no limitation, you should be careful and not to include too many entities in a single API request since it may negatively affect your system and client’s store performance. It is better to extract data in smaller chunks (4-50 items), what guarantees a correct result.
API2Cart makes it possible to extract a maximum of 250 elements in our list methods. Sometimes this value can be smaller for some API-based platforms due to technical limitations on the part of the platform. We recommend selecting values from 20 to 250 individually for each type of request and store. When selecting the count value, you should take into account the request execution time, the list of fields that will be in the response, and how long your application can wait for a response from API2Cart.
Read more about limits from the side of the stores.
When the registration is completed, you are automatically redirected to your API2Cart account. In the “My Stores List” section you will find OpenCart demo store which is available for testing service’s functionality.
You can also add demo stores that can be created in the "Demostores" section of your API2Cart account. More details at Demo store in API integration
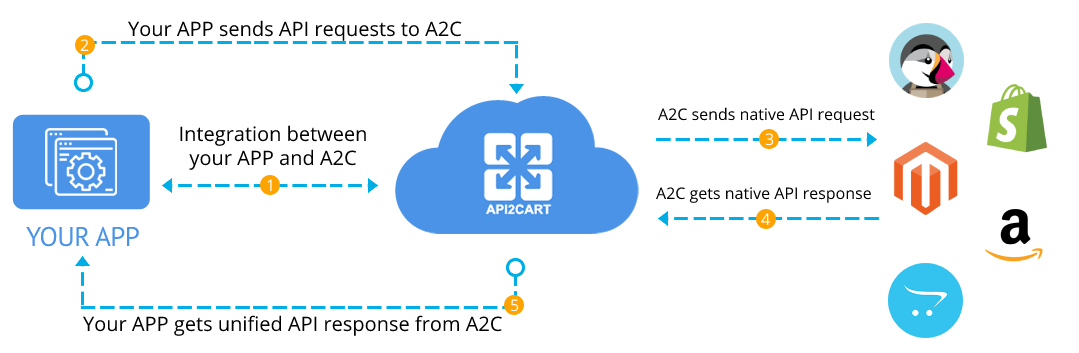
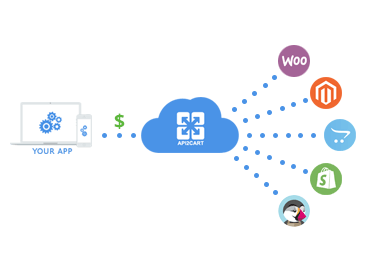
We provide a unified API to work with multiple shopping carts and marketplaces. By integrating with our API, you can integrate with different e-Commerce platforms such as Magento, PrestaShop, Bigcommerce, Shopify, OpenCart, Volusion, etc. at the same time, without any need to develop separate integration solutions for each shopping cart.
The integration works the following way - you already have your business logic module which is integrated with API2Cart. Thus, you receive a complex solution which can work with numerous platforms - hosted and self-hosted. You will have to establish connection via connection bridge or provide store access details - and you'll be able to retrieve necessary data and process it with your solution. So, API2Cart is a universal programming interface which will help you optimize eCommerce integration process.
Event takes place when a user or an owner interacts with the shopping cart for some purpose. For example, events may be considered as user registration, product adding/updating or some other changes on the store.
For real-time synchronization, you can use webhooks. Learn more about webhooks here.
Additionally, if a platform does not support webhooks or if there is no webhook for a specific entity or action, you can use the list method for the corresponding entity with filters based on creation or modification date (provided the method supports these filters). In this case, you need to periodically execute this method to check which entities have been added or modified within the specified time frame.
Parameters supported in the product.add method for Amazon SP-API
asin, ean, gtin, upc parameters are identifiers that identify a product in the Amazon catalog. Every product that is in the Amazon catalog has a unique asin.
To add a product that already exists in the Amazon catalog, you only need to provide the SKU, the product identifier, and the price and quantity. The quantity can be zero. Only integer values are supported. After a while, the product will appear in the seller's catalog and will have the properties of the product that was assigned to the identifier (name, description, attributes, images, etc.) as well as the seller's offer (offer), which is determined by the price and quantity.
Adding a new product that does not exist in the Amazon catalog is a more complex process, as Amazon requires filling out a large number of attributes to create a new product with an indication of the category in which the product will be placed.
Therefore, when creating a product through product.add, if the product identifier that does not yet exist in the Amazon catalog is specified, one of the parameters must be specified: category_id or product_type
To work with Amazon categories, we have added support for the category.count\list\info\find methods.
In the response of the category.list\info methods, the product_types field is displayed in additional_fields. If it contains any data, the ID of this category can be passed in the category_id parameter. Instead of the category_id parameter, you can use the product_type parameter, specifying the value of the additional_fields.product_types field (if the additional_fields.product_types field contains several values, separated by commas, then one of them).
Once one of the category_id or product_type parameters has been defined, you need to pass the attributes of the new product that is being created in the Amazon catalog. For a list of mandatory requirements for a certain product type (product_type) in Amazon, there is a JSON-schema. This JSON-schema is displayed in the category.info method in the additional_fields.category_options field (category.list this field is not displayed to save requests to Amazon).
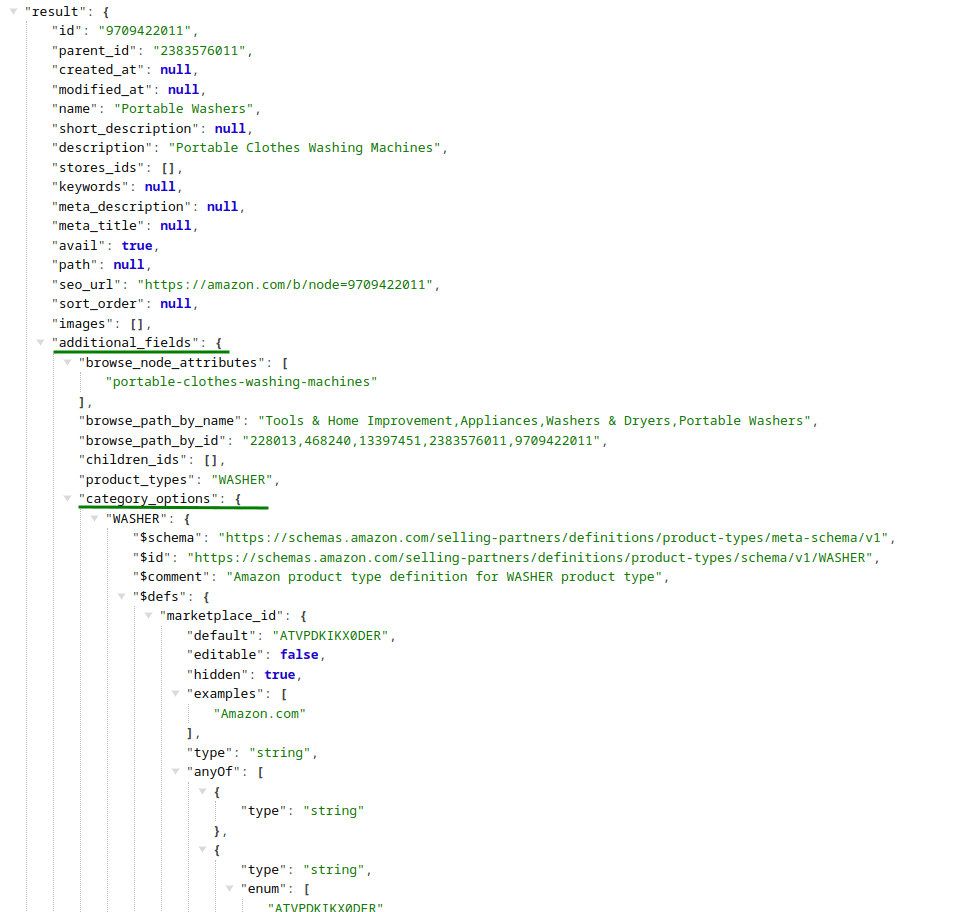
As you can see from the image, the additional_fields.category_options object contains a WASHER object with the corresponding JSON-schema. If additional_fields.product_types contains multiple values, then JSON-schemas for all product types will be displayed.
The data from the JSON-schema fields is passed in the marketplace_item_properties parameter. This parameter is validated both on the Api2Cart side

and on the Amazon side.

The corresponding errors that will be displayed in an unsuccessful attempt of the product.add method.
If all the required properties for a certain product type are passed, the product will be created in the Amazon catalog.

Even if we received a response with return_code: 0 for the product.add method on Amazon SP-API, this does not mean that Amazon will immediately place the product in its catalog and the seller's catalog among its offers. This product may require additional adjustments in the seller's admin panel. Such products are located in the Catalog > Complete Your Drafts menu section.

which will contain product drafts and Amazon's appropriate troubleshooting guidelines for their listing of these products.
To install SDK, download an SDK file for programing language you need.
To install the SDK for the corresponding programming language, follow the instructions described in the README.md file contained in the downloaded archive.
If you use PHP then you can install our SDK with composer.
The installation process will begin and show a message when it’s finished. You can optionally click on “Refresh” button to see whether the extension is installed or not.
The page will reload, and you should see the new module in a list of your modules.
After a successful installation, in the "Add-ons" page you will see the API2Cart plugin.
Customer API methods allow you to manage customers in the store. It is possible to:
Run customer.add method, to add customers to the store, and provide all necessary parameters.
public function apiAdd($params)
{
  $params = array(
    'email'      => '[email protected]',
    'first_name' => 'John',
    'last_name'  => 'Smith',
  );

  return $api->request('customer.add', $params);
}
If you want to update the customer, call customer.list method to retrieve customer id.
public function apiList($params)
{
  $params = array(
    'start' => 0,
    'count' => 5
  );

  return $api->request('customer.list', $params);
}
When you get your customer id, you are able to perform customer.update method.
public function apiUpdate($params)
{
  $params = array(
    'id'         => 11,
    'first_name' => 'Jack',
    'last_name'  => 'Smith',
  );

  return $api->request('customer.update', $params);
}
For more methods jump into documentation.

When signing up for API2Cart account, you are asked to provide name, e-mail address, password.
When adding a new store, you are asked to provide API key and store URLs. You may also be asked to provide your direct database connection to speed up the process. We take appropriate security measures to protect your information. Find out more about our Privacy Policy.
To learn more about adding a store to the service, read here.
In order to see all additional parameters that are unique for your shopping cart, call product.list API method with the params=force_all parameter. Or set the necessary fields separated by comma in parameter "params" (params=length,depth).
It is one of the FTP parameters that defines a precise store location at the host.
To avoid the complexity of technical explanations, it is what makes it possible for you, as a businessman, to retrieve and manipulate the necessary store data from shopping cart databases.
You do not need to pay VAT if you are a business with a valid VAT ID. To avoid being charged VAT, enter your VAT id in the corresponding field. If you have paid the VAT, send an e-mail to [email protected] with your order id and VAT id specified. Our accounting department will refund you the VAT.
Please note that private individuals cannot have VAT refunded. Provide the legal body details when making the payment to avoid being charged VAT.
According to international rules, every API2Cart account refill is accompanied with tax collection. To be more specific, PayPro, the company handling taxes from API2Cart, collects VAT from Canada and EU countries.
For EU, VAT is collected according to the international rules of VAT and then sent to the state the purchaser is from.
For Canada, the GST/HST is collected and paid to the Government of Canada. However, according to the Canadian law, you can get a compensation from the State by providing GST number of the company receiving the payment, i.e. API2Cart. Please, contact our support team via a chat or email ([email protected]) to request the GST number.
Every EU country has its specific VAT percentage that can be seen after the country is chosen. You do not need to pay VAT if you are a business with a valid VAT ID. If you have paid the vat, provide us with your valid VAT id and our accounting department will refund you the VAT. Private individuals cannot have VAT refunded.
Fixed VAT is collected with each recurring payment. Here you can find more information about VAT rates for different countries. The residences of the countries not included into the list won’t be charged while refilling API2Cart account. After each successful payment, PayPro is sending an invoice to the customers email indicated on the order page.
Find out how to avoid paying VAT.We offer a 14-day free trial to test API2Cart API with full access to all features. No functionality is hidden. To get started, simply send a request to [email protected] with the email you’d like to register. Our team will reach out to set up your account.
During the free trial, you can connect your own stores or explore API2Cart’s functionality using our demo store. For more details on available API methods, check out our API2Cart documentation.
If you have any questions or need advice, you can book a call with our manager.
You can disable automatic notifications from API2Cart in the two different ways:
API2Cart service takes serious measures to protect our clients personal and store information.
Sensitive data is protected from unauthorized access. We guarantee not to share your personal account data and keep it confidential. Terms of service security and information protection are provided by our Privacy Policy.
Bridge file. To be able to work with some shopping platforms, it is necessary to install the connection bridge to the store’s root folder. The list of all the platforms that require the bridge installing you can find here.
A connection bridge is the most secure method to access store data. The data received will be used only for providing the work of API2Cart API methods. API2Cart doesn't collect and save any data retrieved from the stores. As an exception, we save the credentials needed for making API requests to the stores. Also, we are caching the store configuration (e.g., the list of supported currencies, time zones, etc.) as it helps reduce the number of requests to the stores.
Here, you can find a video tutorial on how to add a store in the API2Cart admin panel. The bridge can be downloaded automatically with the help of the bridge.download method. More details related to the bridge you can find here.
Technical side of bridge security
IMPORTANT: For each request from API2Cart to the bridge, we form the signature based on request parameters and srore_key. When the request comes to the bridge, the signature is calculated on the bridge and compared with the one sent from API2Cart. If it matches then the request will be performed. Otherwise, the bridge will present an error. As of bridge version 141, communication between the bridge and API2Cart is encrypted. That is the way we do the authorization.
FTP credentials are used to upload a bridge in order to specify connection with self-hosted platforms. When adding a store to API2Cart using FTP, credentials are used only for bridge uploading, and they are not stored in our system.
In order to investigate issues and troubleshoot reported problems or install the connection bridge file, API2Cart support technicians may require access to the online store, web server and database.
It is recommended to temporarily change the password of the admin account before providing a technician with access to your online store. Once your issue is resolved, you should change the passwords of all the provided accounts as soon as possible. The technician will make it clear to you what access exactly we need to solve your problem. More details on which accesses API2Cart techs may ask can be found here.
We highly respect API2Cart customers’ privacy. We have adopted all the necessary measures so that you could be confident about how we protect and manage personal information. For more information please get familiar with the Privacy Policy of our company.
In order to investigate issues and to troubleshoot reported problems, or download the connection bridge file API2Cart support technicians may require access to online store, web server and database.
We understand that this kind of access information is sensitive, and are best kept to a need-to-know basis. With this in mind, we will only require access to your online store where it is absolutely necessary.
We have taken every precaution to ensure that our systems which store access information is highly secure. However, there are additional precautions that we advise our customers take before providing us with access credentials.
In all cases where we require access to online store, we will make it clear to you exactly what access is needed, and why.
Depending on the task which needs to be performed, an API2Cart technician may require access to your online store. We strongly advise you to change the password of Admin/FTP accounts being provided with a random password for API2Cart support for the duration of the issue, with only the essential permissions to your online store.
More often than not, we will require access to an administrator account on your online store. Follow the steps outlined in the Access to your online store section of this article.
In order to investigate the problems, API2Cart support may require access to the files of your online store installation. Follow the steps outlined in the Access to your online store section of this article.
Make sure that this account is a user-level account that has access to the directory in which your online store is installed, unless our technician specifically requests an unrestricted access account (see below).
If a technician asks for 'root access' to your server (a root account with unrestricted permissions), please do not be alarmed. Only in the rarest of cases will we ask for such access - i.e. when our ability to diagnose and resolve your issue absolutely requires it (such as generating or monitoring server logs, or making server configuration changes).
When providing us with root/unrestricted access to your server, it is imperative that you follow the temporary account creation steps outlined in the Access to your online store section of this article.If your systems are protected by IP address authentication (e.g. if you have a firewall), please let us know and we will provide you with the list of our office IP addresses to allow through.
Web browsers request for information from the server, and when it is performed, it sends an Accept header. In case if the server is not able to send that data in the requested format in the Accept header, then the server sends the 406 Not Acceptable error.
The 406 error can appear accordingly to your mod_security rule on the server. Mod_security is a security module of Apache web server, usually permitted automatically on all hosting profiles. In case if a site, page or even function violates one of the rules, server can send the 406 error.
You can turn mod_security off. Also, there is a possibility to disable a specific rule or each domain individually. Thus, if you wish to disable mod_security, go to mod_security using modsec manager plugin in control panel.
Note: There may not be the option of turning mod_security on/off in your cPanel or dedicated servers. In such cases, use command line using SSH or contact tech support to enable/disable this option.
With API2Cart shopping platforms integration is easy
Integrate once, save 4-8 weeks and thousands of dollars on each integration.
Never worry about maintaining separate connections.
In this case there are several simple steps that you can follow:
Check if you enter the correct API Key. It can be found on the store management page:

This kind of error comes when API2Cart can’t create the entity due to shopping cart restriction. For example, if you’re trying to create a user with e-mail that is already registered.
There are two possible reasons for that. Either you have entered the incorrect store_key or the store doesn’t exist. The list of available stores can be found on the following page or using the account.cart.list API method.
Please, make sure you have passed an ID of the entity in the API request. Feel free to contact API2Cart Support Team in case if you still have any issues.
If this error occurs, it means that the cart or cart version, where the store is located, is not supported by API2Cart.
Another reason of the error formation is the database structure that has been changed because of the third-party module.
If this error occurs:
If this error occurs:
If this error occurs:
There is a special API method account.failed_webhooks that allows you to list recently failed webhooks. Please note that information about failed webhooks is stored for 24 hours.
If a particular e-commerce platform does not support native webhooks (e.g Magento, Opencart), webhooks functionality is emulated by querying store data periodically. Currently, this period is set to 300 seconds, so you can expect 5 minutes delay when receiving webhooks from some platforms.
We suggest to try one of the publicly available webhook testing services, for example requestbin.com, webhook.site or similar. Use url generated by the service as webhook callback. If webhook still doesn’t work, contact our support for further assistance
Please check if your callback URL accepts POST requests. It should also return 200 OK HTTP response or else webhook will be considered as “failed” and after several attempts will be dropped.
Discover how API2Cart can ease your eCommerce integrations with a personalized demo. See how seamlessly our solution can connect your software with over 40 eCommerce platforms.
Don't miss out! This is an exclusive one-time offer. Secure your additional trial period by booking your demo now.