How to connect Xero to API2Cart?
This guide shows you how to connect Xero to API2Cart in a few clear steps. Xero uses OAuth 2.0, so the setup takes a little more preparation than a simple API key. However, you only have to do it once per organisation.
To integrate with the Xero platform, follow the instructions below. Before you start, create a Xero developer account. You also need access to the Xero organisation that you want to sync.
What You Need Before You Connect Xero to API2Cart
API2Cart stores only three Xero credentials. Therefore, the whole setup boils down to producing these values:
xero_client_id- the Client ID of your Xero app.xero_client_secret- the Client Secret generated in the app configuration.xero_refresh_token- the refresh token returned after a merchant authorises your app.
API2Cart refreshes the access token automatically. As a result, you never have to store or rotate the short-lived access token yourself. The next four steps produce these three values. After that, you connect Xero to API2Cart with them.
Step 1: Create a Xero Application
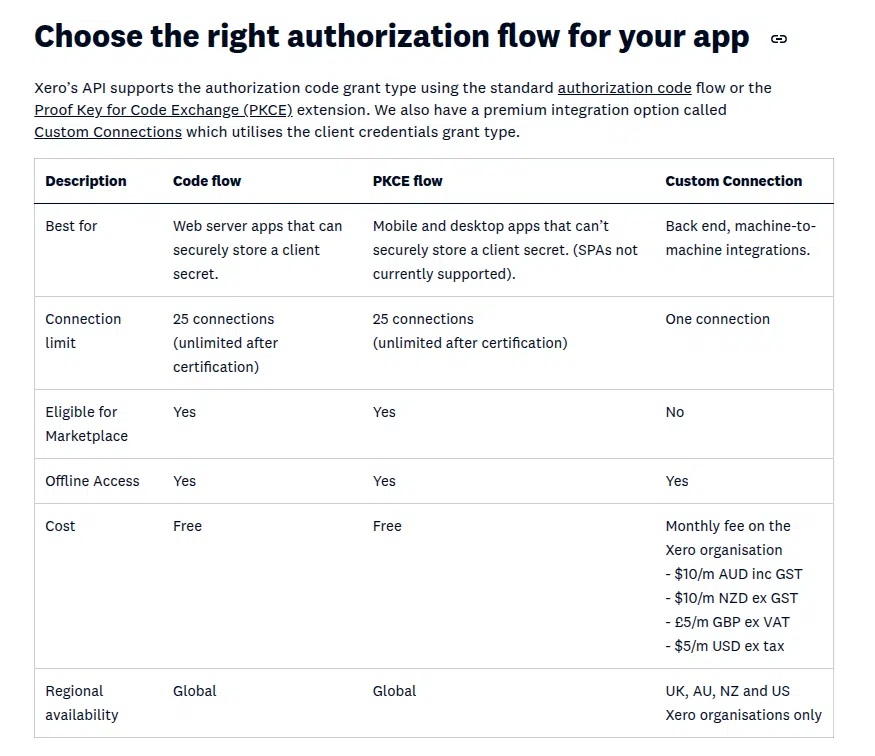
First, open the Xero Developer portal and click New app. Xero asks you to choose an integration type. Select Web app, because this is the only type that supports the standard authorization code flow with refresh tokens.
Then fill in the app name, your company URL and the redirect URI. The redirect URI is the address that Xero calls after a merchant approves your app. Therefore, it must be a page that you control.
Xero offers several integration types, and each one has its own capabilities and limits. The table in the portal explains the differences. For an integration such as API2Cart, the Web app type is the correct choice.
Step 2: Copy the Client ID and Generate a Client Secret
After you create the app, open its Configuration page. There you will find the Client ID and the redirect URI that you entered earlier. Copy the Client ID, because you need it both for the authorization URL and for the API2Cart connection form.
On the same page, click Generate a secret. Xero shows the Client Secret only once, so store it in a safe place immediately. If you lose it, you can generate a new one, but the old secret stops working.

Step 3: Check the Xero App Limits Before You Connect Xero to API2Cart
Xero applies limits at two levels, and both of them affect how many merchants you can onboard. Consequently, it is better to plan for them before you go live.
- 5 to 50 connections per app. The maximum number of organisations an uncertified Xero app can be installed on depends on your plan, ranging from 5 to 50. To remove this cap, you must pass Xero app partner certification.
- 2 uncertified apps per organisation. A merchant can keep only two uncertified apps connected at the same time. If the merchant already uses two, they have to disconnect one first.
You can find more details about application limitations here.
Step 4: Choose the OAuth Scopes
Scopes define what your app may read and write. Moreover, they decide which API2Cart methods will work after you connect Xero to API2Cart. API2Cart checks the granted scopes before every call. As a result, a missing scope returns a clear error instead of a silent failure. The full mapping between API2Cart methods and Xero scopes is in the table at the end of this guide.
Always include offline_access. Without it, Xero does not return a refresh_token. In that case, API2Cart cannot keep the connection alive after the first hour.
Step 5: Build the Authorization URL
Next, assemble the URL that a merchant opens to grant access. Use the Client ID and the redirect URI from Step 2, and separate the scopes with spaces:
https://login.xero.com/identity/connect/authorize
  ?response_type=code
  &client_id=<CLIENT_ID>
  &redirect_uri=<REDIRECT_URI>
  &scope=openid profile email offline_access accounting.settings accounting.contacts accounting.invoices accounting.payments accounting.banktransactions
  &state=123
The redirect_uri value must match one of the redirect URIs saved in the app configuration character for character. Otherwise, Xero rejects the request. The state parameter is optional, but it protects the flow against CSRF attacks, so it is worth using.
Step 6: Authorize the App for an Organisation
Now open the authorization URL in a browser. Xero asks the merchant to sign in and to pick the organisation that the app will access. After that, Xero shows the list of permissions that correspond to your scopes.
Keep in mind that a Xero account may own several organisations. The merchant authorises the app for each organisation separately. So a merchant with three companies repeats this step three times.

Once the merchant confirms access, Xero redirects the browser to your redirect URI. The address bar then contains the authorization code, for example ?code=abc123&state=123. This code is single-use and expires in five minutes, so exchange it right away.
Step 7: Exchange the Code for a Refresh Token
Then send a server-to-server request to the Xero identity service. Authenticate it with HTTP Basic auth. The user name is the Client ID, and the password is the Client Secret:
curl -X POST https://identity.xero.com/connect/token \
-H "Authorization: Basic $(echo -n '<CLIENT_ID>:<CLIENT_SECRET>' | base64)" \
-H "Content-Type: application/x-www-form-urlencoded" \
-d "grant_type=authorization_code" \
-d "code=<CODE>" \
-d "redirect_uri=<REDIRECT_URI>"
A successful response contains access_token, refresh_token, expires_in and the granted scope list. Save the refresh_token, because this is the last value that you need in order to connect Xero to API2Cart.

If the response has no refresh_token, then offline_access was missing from your scope list. In that case, repeat Step 5 and Step 6 with the corrected URL.
Step 8: Connect Xero to API2Cart
Finally, open the API2Cart connection form, select Xero and fill in the three fields below:
xero_client_id- for example811AD782822249B33D1311WE4A550CEExero_client_secret- for examplerXYZVpJyud1NguACRxZiu_BN2tp8mgIhod_6222PZz4sn12kxero_refresh_token- for exampleEHGCzGm11csIOdF0C5_tOR6-_CPOH_hDZE4jPKg3DSe

How API2Cart Uses Your Xero API Quota
Once you connect Xero to API2Cart, every unified call consumes a part of the merchant's Xero quota. Xero applies its rate limits per organisation and per app. The current limits are 60 calls per minute, 5,000 calls per day and 5 concurrent calls. On top of that, a single app may send 10,000 calls per minute across all organisations.
It is important to understand that one API2Cart request is not always one Xero request. Under the hood, API2Cart may perform several native calls to build a unified response or to validate the input data. For example:
item.listreads Items, and it also reads Accounts to resolve account codes and Organisation to resolve the time zone.bill.addreads Accounts, TaxRates and Items to validate the line items. Then it creates the invoice. Finally, it sends a second update when you pass a bill number.bill.payment.updatemay probe Payments, Prepayments and Overpayments in turn, because it has to detect the record type first.
API2Cart reduces this overhead by caching organisation and connection data. In addition, it handles HTTP 429 for you. It waits for the period given in the Retry-After header, and then it retries the call. Even so, plan your daily volume with a margin, especially for bulk imports.
Table of Required Xero OAuth Scopes for API2Cart Methods
Below is the comprehensive list of Xero OAuth scopes required to execute specific API2Cart methods. Use it as a checklist before you connect Xero to API2Cart. Read the table with these rules in mind:
- Scopes joined by or are alternatives, so any one of them is enough.
- Groups joined by + are cumulative, so you need at least one scope from every group.
offline_accessappears in every row on purpose. API2Cart runsconnection.validateautomatically before other methods, and that check needs a valid token pair.- Methods that return date fields also read the organisation time zone. For that reason, they require a settings scope even when the entity itself lives elsewhere.
| API2Cart Method | Required Xero OAuth Scopes |
|---|---|
connection.validate |
offline_access |
connection.add |
offline_access |
connection.update |
offline_access |
connection.delete |
- |
organization.list |
offline_access + (accounting.settings.read or accounting.settings) |
account.list |
offline_access + (accounting.settings.read or accounting.settings) |
account.add |
offline_access + accounting.settings |
account.update |
offline_access + accounting.settings |
account.delete |
offline_access + accounting.settings |
tax.rate.list |
offline_access + (accounting.settings.read or accounting.settings) |
item.list |
offline_access + (accounting.settings.read or accounting.settings) |
item.add |
offline_access + (accounting.settings or accounting.invoices) + (accounting.settings.read or accounting.settings) |
item.update |
offline_access + (accounting.settings or accounting.invoices) + (accounting.settings.read or accounting.settings) |
item.delete |
offline_access + (accounting.settings or accounting.invoices) |
contact.list |
offline_access + (accounting.contacts.read or accounting.contacts) + (accounting.settings.read or accounting.settings) |
contact.add |
offline_access + accounting.contacts |
contact.update |
offline_access + accounting.contacts |
bill.list |
offline_access + (accounting.transactions.read or accounting.transactions or accounting.invoices.read or accounting.invoices) + (accounting.settings.read or accounting.settings) |
bill.add |
offline_access + (accounting.transactions or accounting.invoices) + (accounting.contacts.read or accounting.contacts) + (accounting.settings.read or accounting.settings) |
bill.update |
offline_access + (accounting.transactions or accounting.invoices) + (accounting.contacts.read or accounting.contacts) + (accounting.settings.read or accounting.settings) |
bill.credit_note.list |
offline_access + (accounting.transactions.read or accounting.transactions or accounting.invoices.read or accounting.invoices) + (accounting.settings.read or accounting.settings) |
bill.credit_note.add |
offline_access + (accounting.transactions or accounting.invoices) + (accounting.contacts.read or accounting.contacts) + (accounting.settings.read or accounting.settings) |
bill.credit_note.update |
offline_access + (accounting.transactions or accounting.invoices) + (accounting.contacts.read or accounting.contacts) + (accounting.settings.read or accounting.settings) |
bill.payment.list |
offline_access + (accounting.transactions.read or accounting.transactions or accounting.payments.read or accounting.payments) + (accounting.transactions.read or accounting.transactions or accounting.invoices.read or accounting.invoices) + (accounting.settings.read or accounting.settings) |
bill.payment.add |
offline_access + (accounting.transactions or accounting.payments) + (accounting.transactions or accounting.banktransactions) + (accounting.transactions.read or accounting.transactions or accounting.invoices.read or accounting.invoices) + (accounting.contacts.read or accounting.contacts) + (accounting.settings.read or accounting.settings) |
bill.payment.update |
offline_access + (accounting.transactions or accounting.payments) + (accounting.transactions or accounting.banktransactions) + (accounting.transactions.read or accounting.transactions or accounting.invoices.read or accounting.invoices) + (accounting.settings.read or accounting.settings) |
The methods connection.list and connection.supported_integrations return data from API2Cart itself. For this reason, they do not call the Xero API and need no scopes at all.
Troubleshooting
Most problems appear right after you connect Xero to API2Cart, and they usually come from a handful of causes. Therefore, check these first:
- "Some parameters are invalid! Please check your xero_client_id and xero_client_secret." - the credential pair does not match the app, or the secret was regenerated.
- "Some parameters are invalid! Please check your xero_refresh_token." - the token was already rotated, or the merchant revoked access in Xero.
- "Missing required scopes: ..." - the merchant approved the app before you added a scope. Consequently, they have to re-authorise the app through a new authorization URL.
- "Access to your Xero account has been revoked." - the app was disconnected in Xero, or the trial period of the organisation expired.