How to connect nopCommerce to API2Cart?
API2Cart connects to nopCommerce through the API Connector Plugin — a free plugin installed on your nopCommerce store. The plugin exposes a secure, encrypted API endpoint that API2Cart uses to work with the store data (products, categories, customers, orders, shipments, and more). The plugin supports nopCommerce 4.90.
Connecting a store takes three stages: get the plugin, install and configure it on the store, then add the store to your API2Cart account.
Before you begin
You will need:
- An API2Cart account and your API key (available in the API2Cart dashboard after registration).
- Administrator access to the nopCommerce store you want to connect.
Step 1. Get the plugin
There are two ways to get the connector plugin — pick the one that fits you:
Option A — nopCommerce marketplace. Download the API Connector Plugin by API2Cart from the official nopCommerce marketplace. This is the standard, ready-to-use build.
Option B — Plugin Builder (white label). If your plan includes the Plugin Builder feature, you can generate a personalized build of the connector directly from your API2Cart account: open Plugin Builder in the dashboard sidebar, choose nopCommerce as the platform, and set your own plugin name, description, author, brand name, and logo. The resulting ZIP is branded for your company — convenient when you distribute the plugin to your own customers and don't want them to see any third-party branding.
[API2Cart dashboard → Developers Plugin → Builder → nopCommerce selected, branding fields filled]
Both options produce a ZIP archive ready for upload to the nopCommerce admin panel.
Step 2. Install the plugin on the store
- Log in to your nopCommerce admin area.
- Go to Configuration → Local plugins.
- Click Upload plugin or theme and select the ZIP archive from Step 1.
[nopCommerce admin → Configuration → Local plugins → Upload plugin or theme dialog]
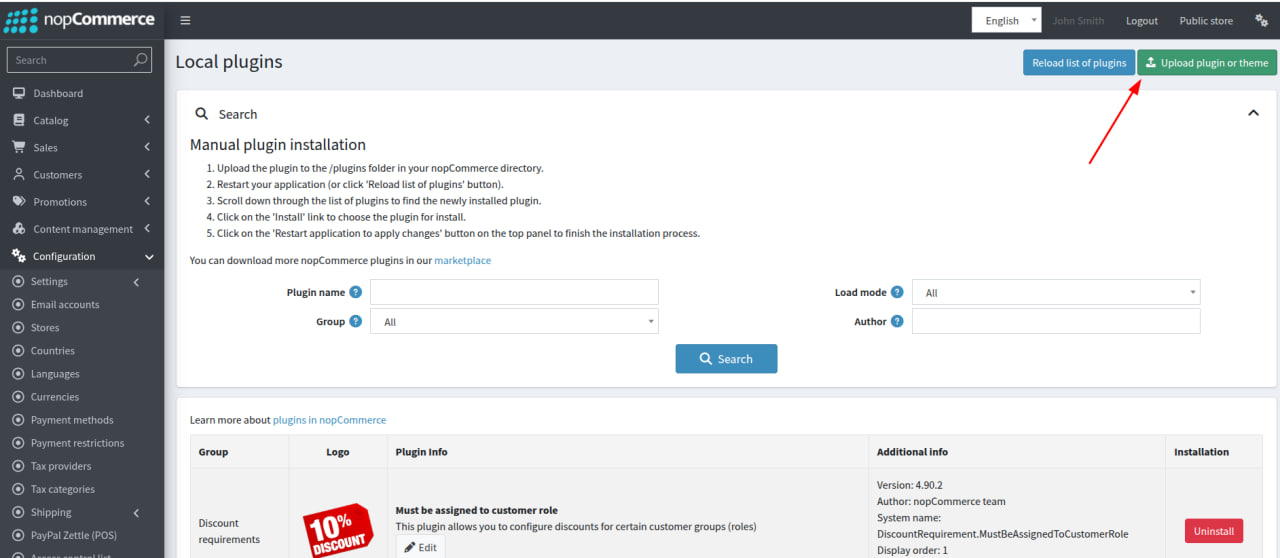
- After the upload completes, find API Connector Plugin in the plugin list (group Misc) and click Install.
- When prompted, restart the application to apply the changes.
Step 3. Configure the plugin and copy the connection details
- In Configuration → Local plugins, find the installed plugin and click Configure.
- On the configuration page you will see the values needed to connect the store:
- Token — the access token API2Cart will authenticate with. Click the field to select it and copy it.
- API URL — the endpoint the plugin exposes on your store. Copy it as well.
- Webhook Secret (optional) — only needed if you want to receive real-time webhooks from the store.
- In the Action Scopes table, control which data API2Cart may read or write per entity (products, orders, customers, etc.). Core actions (connection validation and store info) are always enabled. Adjust the checkboxes and click Save.
[plugin Configure page — Token, Webhook Secret, API URL fields and the Action Scopes table]
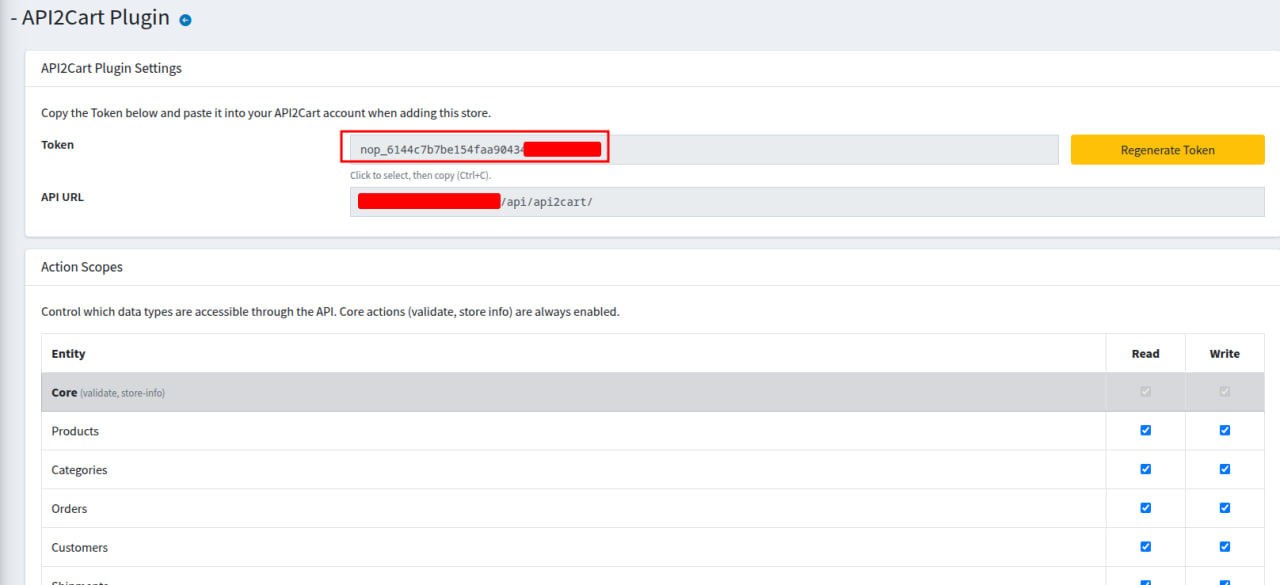
Note: the Regenerate Token button invalidates the current token — existing API2Cart connections will stop working until you update the store settings with the new value.
Step 4. Add the store to your API2Cart account
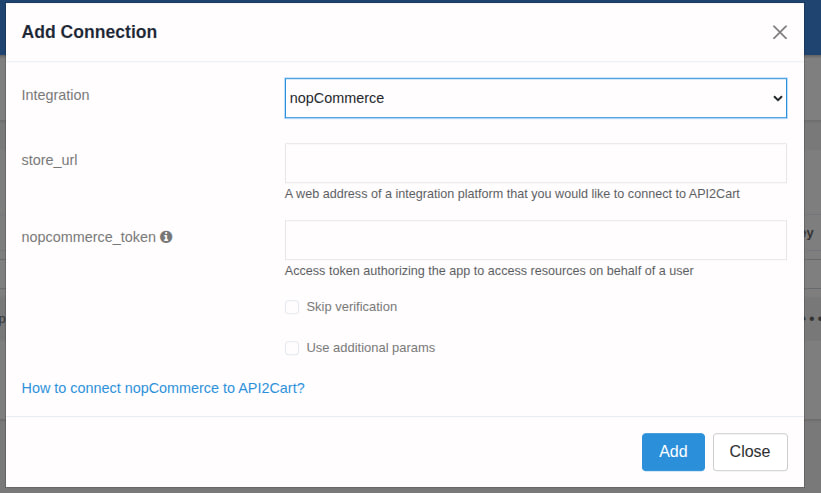
- Log in to the API2Cart dashboard and click Add Store.
- Choose nopCommerce from the platform list.
- Fill in the connection form:
| Field | Value |
|---|---|
| Store URL | Your storefront URL, e.g. https://your-store.com |
| bridge_url | The API URL copied from the plugin configuration page |
| nopcommerce_token | The Token copied from the plugin configuration page |
| nopcommerce_secret (optional, under "Use additional params") | The Webhook Secret from the plugin — required only to receive webhooks |
- Click the button to add the store. API2Cart validates the connection automatically and the store appears in your store list.
[API2Cart dashboard → Add Store → nopCommerce connection form]
Step 5. Or add the store via the API
You can do the same programmatically with the account.cart.add method. It is a POST request — authenticate with the x-api-key header and pass the connection parameters in a JSON body:
curl --location 'https://api.api2cart.com/v1.1/account.cart.add.json' \
--header 'x-api-key: YOUR_API_KEY' \
--header 'Content-Type: application/json' \
--data '{
"cart_id": "Nopcommerce",
"store_url": "https://your-store.com",
"bridge_url": "API_URL_FROM_PLUGIN",
"nopcommerce_token": "TOKEN_FROM_PLUGIN",
"nopcommerce_secret": "WEBHOOK_SECRET_FROM_PLUGIN"
}'
nopcommerce_secret may be omitted if you don't need webhooks. The response contains the store_key you will pass to all further API calls for this store.
What's next
The store is connected — you can now retrieve and manage its data with the API2Cart API methods using your api_key and the store's store_key. Which methods are allowed is governed by the Action Scopes you set in the plugin, so you can revoke or extend access at any time from the nopCommerce admin without reconnecting the store.
If anything goes wrong during the connection, contact us via live chat or submit a request — our support team will help you out.